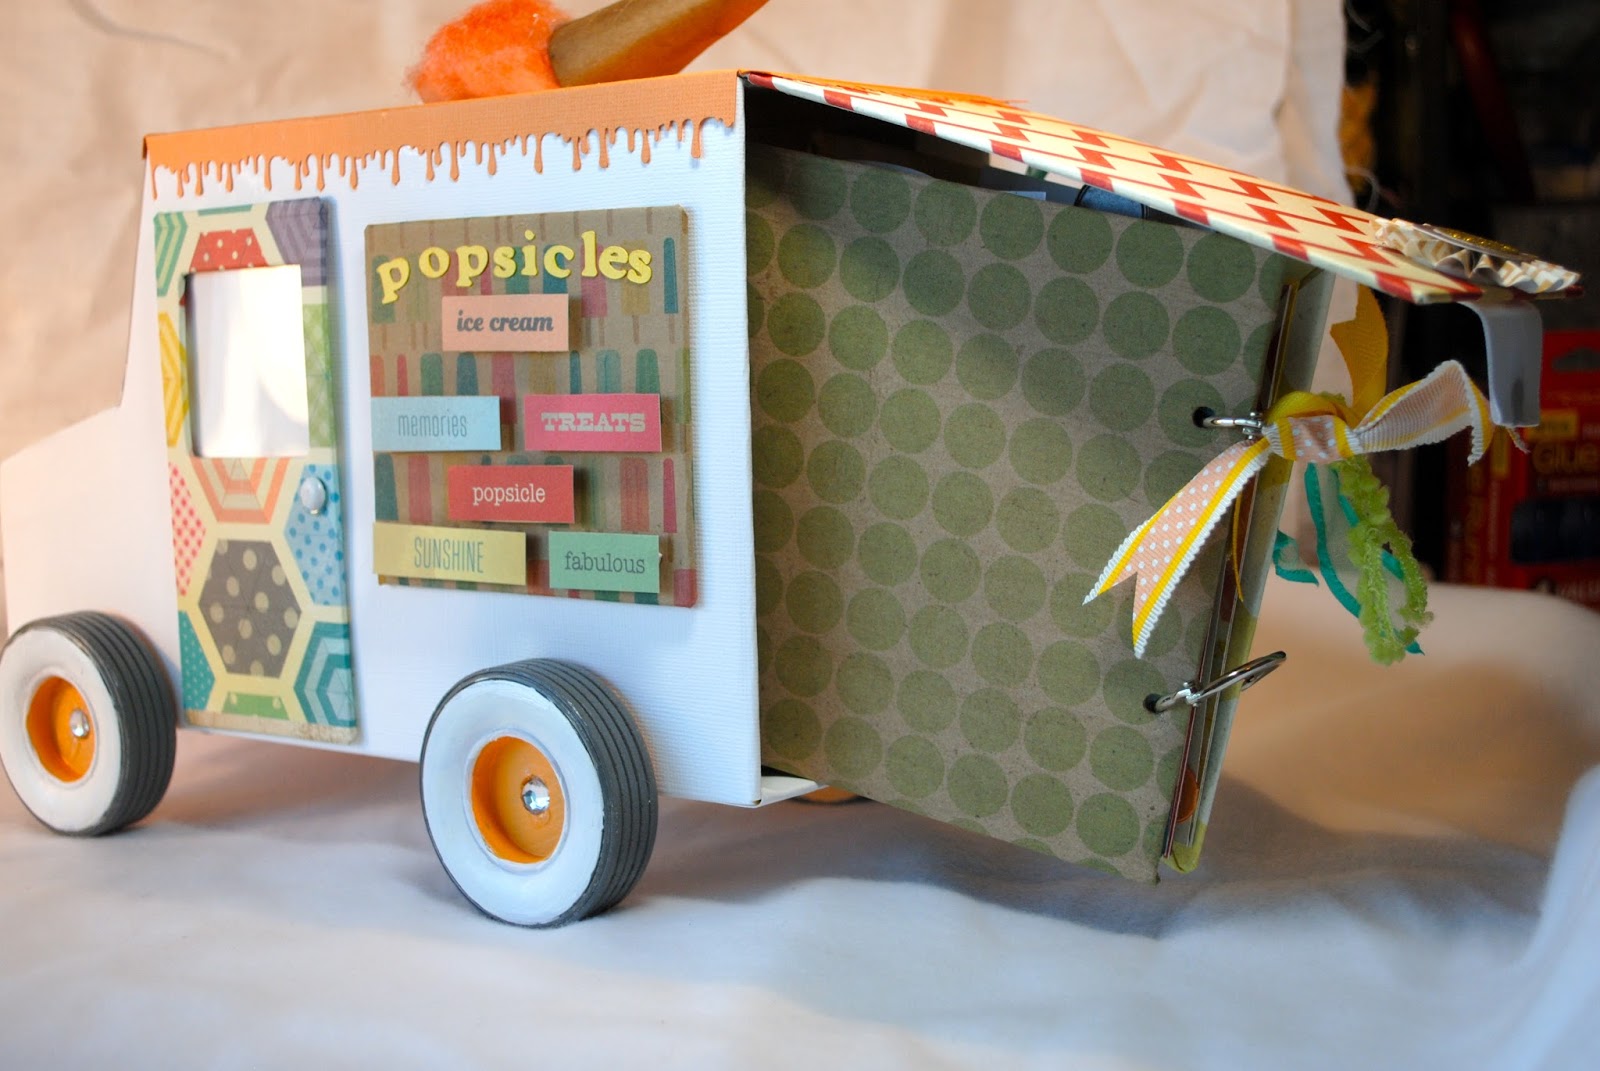
Summertime is the perfect time for ice cream! Join me on Monday to create this adorable ice cream truck that has a hidden mini album inside.
I will be using The Pier paper collection by Crate Paper. It has so many cute summertime prints. In the last photo above you can see the mini album peeking out from the back door of the truck (sorry, I only got a photo of the back of the mini, bummer). The mini is perfect for dropping your 4 x 6 summer pics in.
Class supply list: Your adhesive arsenal (uhu stick, favorite liquid glue, scor or red line tape in 1/4"and optional 1/2"), pencil, ruler, scor board and scor tool, paper trimmer, and scissors. For those who have signed up for the morning (daytime) class, lunch will be served. There will also be a cool sumertime treat!
Hope to see you there. Should be fun in the sun (well, I vote to stay inside with the air conditioning!!!).
Saturday, July 13, 2013
Friday, June 21, 2013
I won!
I won! I am an avid blog follower of several different blogs. A few weeks ago Stampendous stamps joined with Co'ordinations paper (by Tim Holtz), David Tutera, and May Arts ribbon to host a blog hop. And of course there were prizes. I followed all week because there were some adorable projects. Not to mention that you can learn something new sometimes. Had to leave a comment each day...no biggie, it was fun.
Well, I won. I got my package the other day and it was great. They sent a card size pack of the Co'ordinations paper, the sanding set to use with the paper, a selection of ribbon pieces, a selection of the new card pieces by David Tutera, a jumbo stamp block, and a set of jumbo Stampendous stamps! Wow! Very generous. I just love all the goodies but most especially love the stamp set.
This is the stamp set. Isn't it wonderful? If you are looking for some fun today head over to the Stampendous blog. They have been hosting another blog hop combined with Etch Art. Amazing things!
I will be posting some of the fun stuff I make with this very soon. Enjoy you first day of summer! And remember, it's too hot outside so come in and craft.
Well, I won. I got my package the other day and it was great. They sent a card size pack of the Co'ordinations paper, the sanding set to use with the paper, a selection of ribbon pieces, a selection of the new card pieces by David Tutera, a jumbo stamp block, and a set of jumbo Stampendous stamps! Wow! Very generous. I just love all the goodies but most especially love the stamp set.
This is the stamp set. Isn't it wonderful? If you are looking for some fun today head over to the Stampendous blog. They have been hosting another blog hop combined with Etch Art. Amazing things!
I will be posting some of the fun stuff I make with this very soon. Enjoy you first day of summer! And remember, it's too hot outside so come in and craft.
Wednesday, June 12, 2013
Fairies
It seems like there are fairies everywhere these days. Especially garden fairies, or fairy gardens. A few weeks ago I had a mixed media class where we made an unusual little house that stood on feet. It also held a mini album in the back. I built a miniature one to help with a visual of how to make it. As the class went on I decided to embellish my little mini house as well. I always have some odds and ends in my class bag, so....
I made a mini fairy house! There is a fairy garden started in Scrapp ' n Savvy's window so this is the perfect addition.
Wings and a bow. Pearl paint. A place in the back to add some pretty flowers. It turned out so cute!
I am working like a crazy woman these days so I apologize for the lack of posts. I will have some yummy good things to share with you very soon.
Have a wonderful day and stop back by!
I made a mini fairy house! There is a fairy garden started in Scrapp ' n Savvy's window so this is the perfect addition.
Wings and a bow. Pearl paint. A place in the back to add some pretty flowers. It turned out so cute!
I am working like a crazy woman these days so I apologize for the lack of posts. I will have some yummy good things to share with you very soon.
Have a wonderful day and stop back by!
Sunday, June 2, 2013
Engraved Memories class
Good evening ladies. Tomorrow is the Engraved Memories class! Woo hoo! I am so excited. I have some new things for you all.
No special supplies needed. Just your basics: paper trimmer, scissors, ruler, pencil, distress ink in black or a dark brown (I used black soot), your favorite liquid adhesive or UHU stick, 1/4 " red or scor tape, glue dots, pop dots, a Tim Holtz tiny attacher, and a cropadile.
I will also have a special treat to share. See you tomorrow!
No special supplies needed. Just your basics: paper trimmer, scissors, ruler, pencil, distress ink in black or a dark brown (I used black soot), your favorite liquid adhesive or UHU stick, 1/4 " red or scor tape, glue dots, pop dots, a Tim Holtz tiny attacher, and a cropadile.
I will also have a special treat to share. See you tomorrow!
Saturday, May 4, 2013
Secret Garden Mini Album
Wow. I did not realize it had been so long since I posted something! It has been, and always is, chaotic around here. Just wanted to do a quick post about the Secret Garden Mini Album class. The class is FULL! yeah! Class is Monday at 10:30 ladies! I'm bringing goodies....
I fell in love with the Graphic 45 paper collection the moment I saw it. It is just so lovely. Every single sheet of goodness has amazing beauty. If you have not held a sheet of this in your lovely little hands and drooled a bit over how pretty it is, then you are seriously missing out! It might be as good as chocolate. Well, ok. A close second! But really. It's pretty. This is the cover of the mini album (measures a good 7 x 9 and is perfect to hold 4 x 6 prints). We will use the whole paper collection in this one.
Ladies, supply list: Your basics including paper trimmer, scissors, pencil, UHU or favorite liquid glue to "wallpaper" with (brayer if you use one), 1/4" red line or scor tape, pop dots, glue dots, and crop a dile. You will also need something to "cover" the edges of the chipboard pages with. I used picket fence distress stain. You could use acrylic paint, paint dabbers, white sharpies, inka gold, or other colors of distress stain. Your choice. There are some options at the store as well. I also used distress inks in victorian velvet, frayed burlap, and shabby shutters. Obviously, you can use any colors you desire. Just letting you know what I used. Some of these colors are at the shop. The optional for this class is the Banner set and the Chipboard #1 set - both are available for purchase at Scrapp n' Savvy.
I am looking forward to a fun morning with you all. See you Monday. Oh, full pictures will go up in the Tutorial section on Monday morning.
Monday, April 15, 2013
a little bit of mixed media
I have been playing around a bit in my art journal lately. I actually made a goal at the beginning of the year to do something artistic every day. Sounds easy right? Well, sometimes not so much! I doodle a lot. I also have found that I love mixed media art. I really enjoy the layering and using different types of media on one piece.
Today I decided I would share some of my mixed media pieces with you. I am working in a 9 x 12 bound journal with 120 lb. paper. Depending on what type of medium I am using I might gesso the page to prime it for painting or inking. Here we go...
This is a new work in progress. I like to prepare multiple backgrounds at once. This is one that I made the background about 3 months ago. I used Tattered Angels spray mist in a dark pink then added gelattos in different pink shades and turquoise at the top. I heavily sprayed the turquoise so it would run and drip down the page. I am planning on flowers of some sort. Had the pretty papers leftover from a scrapbook project, so.....
By far one of my favorites. I love the dimension (a bit hard to see here, sorry). I love using my leftovers from other projects and the little bits and pieces that are left as well. The main houses are first made with paper. I have added various things like ribbon, flowers (whole and cut up), and even a metal label holder. The stems are made of cork. Love the colors. (You can even see at the bottom where a previous page leaked through onto this one!)
Just a corner of one that has more subdued colors. I love how the words seem to lift from the page.
Another of my favorites (is it a blue thing or what?). I started with acrylic letters that I temporarily placed on the page. I added paper, paint, and pastels all around them. I lifted the letters and played with colors within the letters and then outlined them. I like how some of the letters disappear into the houses.
I finished this one yesterday. Not so happy with the bird but love, love, love the rest. Multiple layers of papers, paints, pastels, Pitt pens, modelling paste.
A close-up of the upper corner. I really like the bleed through effect here. I originally had used the Golden fluid acrylics. Added coarse modelling paste with a mask. Then I used pastel pencils and Pitt pens (india ink) layering them. I really like how you can still see the dictionary page beneath but also that the colors are so vibrant.
I took advantage of some of the words that were on the paper I had used. Unexpected, but just right.
Lots of layers of purples. I was after the color on this one.
Multiple layers of mists and sprays, modelling creme and masks, and fluid acrylics.
I had been dying to try this technique for awhile, so.... I used clear liquid glue (like elmers) and made a pattern on my paper. Let it dry completely. It acts like a resist but also like a "barrier". It created this awesome stained glass effect. I used gelattos and Pitt pens to get the deep colors and shading. A cool thing happened when I was coloring it.....I had used gelattos but wanted to make sure they were dry. I decided to speed things up and use the heat gun to dry it. Well, obviously I held it too close to the paper and the glue began to bubble! It looks so cool! I just could not get a close up that showed it well. It really fits since the page is beachy! Oh, I stamped the images first with black staz on ink then added the glue lines, then gelattos, then finally Pitt pens.
My favored mediums right now are: gelattos by Faber-Castell. These little gems are creamy little twist up goodies of color. They look like chapstick tubes. I just love them. They are water reactant and so much fun. I also love using Faber-Castell pastel pencils. Creamy and very easy to use. Perfect to add that just right shadow. Pitt pens. Oh my goodness! I became addicted to these at CHA. Again, by Faber- Castell. These pens come in two sizes: large and regular pen size. They are india ink. I love that they can be "rubbed" with your fingers to move the ink around. I love to use them to make things pop from the page. I also have found that when I color with several of the same color family it makes awesome blended images (think grass, or sky). I love that I can use them to "color" on my stamps and stamp the image on my paper. Much quicker and easier than getting out the stamp pad sometimes. And the colors are endless.
I also use Golden's fluid acrylics. Wonderful, wonderful product. I love that it is not as viscous as the heavy body acrylics. Perfect for light color washes. Mixes perfectly. Colors are great. Also love that I can buy them in 1 oz sizes that fit perfectly in my cases. I also use the Golden gesso (white and black), pastel ground, coarse modelling paste, and a new one for me fiber paste (very cool effects). Of course, I always have Sakura pens around to doodle with; Copics to add some color; watercolor pencils; true india ink to dribble with; mists and sprays; perfect pearls to add some shimmer with. I just love to add different layers
I hope you enjoyed looking. Be creative today!
Thursday, April 11, 2013
Love this canvas
Thought I would share a canvas that I made yesterday. I made it for my secret teacher at school (shh! Don't tell!) I was working with such limited info: She likes the color blue. She likes animals. She is a bit of a girly girl. She is faith filled.
So, I just pulled out some of my stash and started creating.
Sorry about the poor picture quality. It is pouring down raining right now and I had to deal with only indoor lighting.
The base is made using several different blue colored gelattos from Faber Castell. I then added some old gospel music pages, cheesecloth, and then covered the whole thing with white crumbled tissue paper. I let this coat dry then lightly drug a gesso filled brush down the whole canvas. It "stuck" on the textured parts and left a nice effect. Once all that was dry I decided that the color was "too blue". So, I gave it a color wash using the Golden liquid acrylic phalo green. I like how the music paper shows through and how the gesso has created some interesting texture along the edge.
While this was drying I laid out my elements. I tried to use rich texture papers and deep, lovely colors. Adding the vintage ribbons just gives the canvas some depth. I used pastel pencils on the edges of the papers smearing as I went along, to give some dimension. Once I had chosen the papers, I attached them with foam tape, sometimes 2 of them stacked, to allow the papers to pop! All of the other embellishments were added at the end. The "love" letters are cork and have been slightly distressed with pastels and gesso that I colored with shavings of the pastels (kinda cool effect that does not show well in the photo above. Sorry).
I really like how it turned out. I added the bow around the edges to finish it off. I hope she likes it.
Ok....the day begins at a dead run! Go. Be inspired today. Or, go inspire someone today!
So, I just pulled out some of my stash and started creating.
Sorry about the poor picture quality. It is pouring down raining right now and I had to deal with only indoor lighting.
The base is made using several different blue colored gelattos from Faber Castell. I then added some old gospel music pages, cheesecloth, and then covered the whole thing with white crumbled tissue paper. I let this coat dry then lightly drug a gesso filled brush down the whole canvas. It "stuck" on the textured parts and left a nice effect. Once all that was dry I decided that the color was "too blue". So, I gave it a color wash using the Golden liquid acrylic phalo green. I like how the music paper shows through and how the gesso has created some interesting texture along the edge.
While this was drying I laid out my elements. I tried to use rich texture papers and deep, lovely colors. Adding the vintage ribbons just gives the canvas some depth. I used pastel pencils on the edges of the papers smearing as I went along, to give some dimension. Once I had chosen the papers, I attached them with foam tape, sometimes 2 of them stacked, to allow the papers to pop! All of the other embellishments were added at the end. The "love" letters are cork and have been slightly distressed with pastels and gesso that I colored with shavings of the pastels (kinda cool effect that does not show well in the photo above. Sorry).
I really like how it turned out. I added the bow around the edges to finish it off. I hope she likes it.
Ok....the day begins at a dead run! Go. Be inspired today. Or, go inspire someone today!
Subscribe to:
Posts (Atom)