background

Wednesday, June 22, 2016

Garden Color

I am a Pinterest addict.  I admit it.  I love to surf through Pinterest and pin all these wonderful ideas!  I especially love that I can go back to my pins for inspiration, or sometimes to purchase an item, or to get a great new recipe.

So I have been seeing these amazing painted fences on Pinterest.  While I would love to paint my fence to add some fun and color to my backyard, I have a shared fence and painting it is not an option.  I have thought about it for a while and decided to paint a garden gate that I can put in my garden.  Problem solved!  I was able to purchase the 4 ft fence boards at Lowe's for $1.38 each!!  I used some scrap wood to anchor them together on the backside.

It's not perfect but it looks so adorable in the garden!  I can hardly wait for some of the plants to creep up the sides....

I decided that I should paint the fence boards a light whitewash to help it stand out in the garden.  I have used all outdoor paints so it should stand up to the weather.  I will say it was not nearly as easy as I thought it would be!  One - the boards are really rough.  I even sanded them some.  Two - the boards do soak up the paint quickly.  And three - it is a BIG surface!  My son helped my paint the leaves and pick out colors.  I learned that it was much easier to use a thicker brush heavily loaded with paint.  It is so humid here that I painted inside the house (brought the fence in the night before to acclimate the wood to the inside temps).  Once it was dry I set it outside.  I have placed it in the garden but first added a light coat of polycrylic in hopes the colors will stay nice and bright.

I just love it!  We have gone a bit silly painting old fence boards here!  Oh, see the little white boards sticking out at the sides?  Those are the backing boards I used to hold it all together.  I could not find the saw when I was putting it together and told myself I would cut them off after I painted.  Not.  I have hung birdhouses, small lanterns, and even a small container of climbing vines on them!  Really integrated it into the garden.

Enjoy your day!

Friday, June 17, 2016

Playing with color

Good morning everyone.  It has been a bit since I posted a project.  Life has consumed me!  I am sure some of you completely understand.  I look forward to school ending each year so that I can spend time with all of my children.  However, as they have grown and moved to college, the time isn't as specified as it once was.  I am learning to enjoy all my small moments with each one of the children whether it is an hour or a week.  Seems so crazy to think that life was simpler when they were all small and at home!

So, I carved out some play time in the craft room - finally.  I had some cards that needed to be made, a few vinyl projects to make, and a bunch of cleaning to do!  First I want to show you a little pure fun I had:


I was thinking about Father's Day coming up and decided to make a fun tag for my dads gift.  Gecko Galz has some of the best images.  Looking through my stash I found several of my favs and decided to add them all to the tag.  Somehow I ended up using most from the Through the looking glass sheets.  Once I had adhered all the images on different levels I covered the entire thing in clear gesso. I chose my color scheme and using my fingers began blending all the colors.  I just could not get a good pic to show the depth.  But I am hap[y with it.

Next up, a vinyl project.  My boys run cross country and track and have plenty of ribbons and medals from those events.  For several years I have promised to make a display for them.  Here is what I made:


This is a 12 x 12 board I bought from the hobby store and spray painted navy.  I cut the design from 631 vinyl and applied it to the board.  I let my board dry for several days before adding the vinyl because I was worried about the vinyl lifting my paint off - but it didn't!  I dabbed white acrylic paint through my vinyl and then removed all the vinyl when done.  I did have to do some fine touch ups but I love it!   (Can you spot my mistake?  Look in the wing of the shoe - I apparenty left a small piece of vinyl there!  oh well)  I made one for each of the boys and one of my sons friends.  My thought was that as they need more room for medals they can add more cup hooks on the bottom and sides of the board.  My oldest had over 200 medals so he has a lot more hooks and we hung them 5 per hook.  Looks awesome hanging on the wall.

The summer heat has begun in Texas.  Since I don't like the high humidity I am hoping to get some things done in the craft room!  Be inspired today - and stay cool!

Sunday, May 15, 2016

Simplicity

Sometimes the best thing is just simple.  No bling.  No fuss.  Just simple.  Especially when an image is so beautiful that you want to showcase it.  I find that so many of the images from Gecko Galz are so stunning that I really want the image to be front and center.

I love having some favorite images on hand to use for cards.  Today I thought I would share a few that showcase the image - plain and simple.

Both of the first 2 are small and simple.  Great for thank you notes or a quick wish.  I have used images from Bluebird of Happiness collage sheets.


This one may not seem so simple, but I have tried to use "things on my desk" with a few images.  The bird is from Bluebird of Happiness and the flowers are all from Pretty Petals.  It is a super quick and easy design.


Try some simplicity.....use a Gecko Galz image to make a quick and simple project.  Have a great Sunday!

Wednesday, April 20, 2016

Spring has arrived

Spring has definitely arrived here!  Although it seems like the weather is spring one day and winter the next at times.  The beautiful flowers are in bloom.  My climbing rose has already bloomed and been trimmed.  Butterflies are fluttering around my garden.  So, I have been inspired!

First, I added the month of April to my craft room calendar.  I chose several lovely images from Gecko Galz.  I used images from the Butterfly Kisses (find it here).  The background is an Authentique paper.  I matted each image in a deep brown so that they would pop off the background.  I added the iridescent green ribbon through the middle and then the images.  To finish I added some punched greenery and a few butterflies that I fussy cut from the Butterfly Kisses image sheet.


I have a friend who loves butterflies and her birthday is this week.  So I decided to play with another image from Butterfly Kisses images sheet.  The card front opens to reveal the birthday wish (just pull on the bow and a mini magnet releases to lift the paper).  The lovely rose cameo is from the Cameo image sheet from Gecko Galz.  I can hardly wait to give it to her!

I must have gotten stuck on butterflies this week.  The images from butterfly kisses are just so lovely!  I finished this quick little card with the leftover images from the image sheets.  Quick matting on pale pink, pop dotted on the card base, and add some flowers and done!  Perfect to have on hand to add to a quick gift.


There seem to be so many birthdays and occasions in the spring.  I think I will go spend a little more time with these images from Gecko Galz.  I can think of so many pretty cards to make to add to my card stash!

Enjoy your day!

Saturday, April 16, 2016

Easter in a box


At the Gecko Galz retreat this past month there was a contest using cigar boxes.  You chose your box and a Gecko Galz collage sheet.  Then you could make anything you wanted to!!!

I just LOVE the vintage Easter images on the Easter Joy collage sheet so I chose to use that for my box.

Here is my box, transformed into an Easter decor:

Front:

Back:

Opened to inside:

Inside left:

Inside right:

Details:


I painted the cigar box with distress paints.  And hated the color!!!!  So, I added weathered wood distress paint on top of the broken china that I alfeady had on it.  And fell in love!  I used the Tim Holtz Wallflower paper stash for my papers.   There are so many cute images on the collage sheet from Gecko Galz that I just had to use them.  I fussy cut some for the inside and others were matted for the covers.  The inside pieces are made to stand up by adding some some pieces of acrylic behind them for support.  The tree is a Tim Holtz bottle brush tree colored with Bundled Sage distress spray and then Frayed Burlap to darken it.  I used several things from my stash of goodies: a Graphic 45 door handle and base, a vintage silver plate egg cup, glitter wood eggs, paper rosebuds, vintage ribbons, and cheesecloth.

Inspired?  Grab a collage sheet and have some fun!

Tuesday, March 15, 2016

Gecko Galz Mixed Media Canvas

Hi ladies.  Today I thought I would share the mixed media cans we made at the Gecko Galz retreat this past month.

I chose to make my "canvas" on some chipboard that I already had.  It is a bit odd sized at 12 x 9 but it will fit an old frame that I have here.  Obviously you could use a pre-made canvas for yours.  I began with a coat of gesso on the board.  Once it was dry I added a piece of Tim Holtz tissue paper - melange- using matte medium to adhere it.  Why gesso and matte medium?  Well, since my chipboard was a brown color I wanted to make sure I had some light behind the tissue.  Gesso is quick and easy so I chose to use it.  The matte medium can be replaced with Mod Podge is you wish. I have adhered the tissue to the front and wrapped it to the back of the board.  A final coat of matte medium will seal it.  Let this dry completely before moving on.

Once it is dry add distress ink with an applicator (I used vintage photo but any brown will work) to the entire front.  The edges were inked more heavily than the rest.  I will add here that there were many at the retreat that used colors - blues, yellows, pinks, greens - and they were stunning!

At this point it is about assembling all the pieces.  I printed a the Fly Free collage sheet on white heavy weight card stock.  Each image was cut out and those I chose to use were then matted on a dark brown heavy weight card stock.  There are more images on the sheet than what I chose to use.

Paint your wood pieces (the swirls) with acrylic paint.  I used alcohol ink on my metal pieces to make them match my color scheme.  Here are the detailed pics of the other objects on the canvas:


This is at the top right.  I had to substitute some items from the original since they were no longer available for purchase.  I tried to keep everything as close to the original as possible.  The butterfly is chipboard so it should be painted.  I used distress paints in peeled paint, broken china, and frayed burlap.


These mini frames are from my stash....I simply punched a hole in the center and added the door knob.  This element is at the lower edge.


These little pieces were so hard to find!!!  I had to change the Maya Road circles that have the hearts on my original to these.  These are from the jewelry section at Michaels.  You can alcohol ink them if you want.  The "time" is a Tim Holtz letter bar that is discontinued.


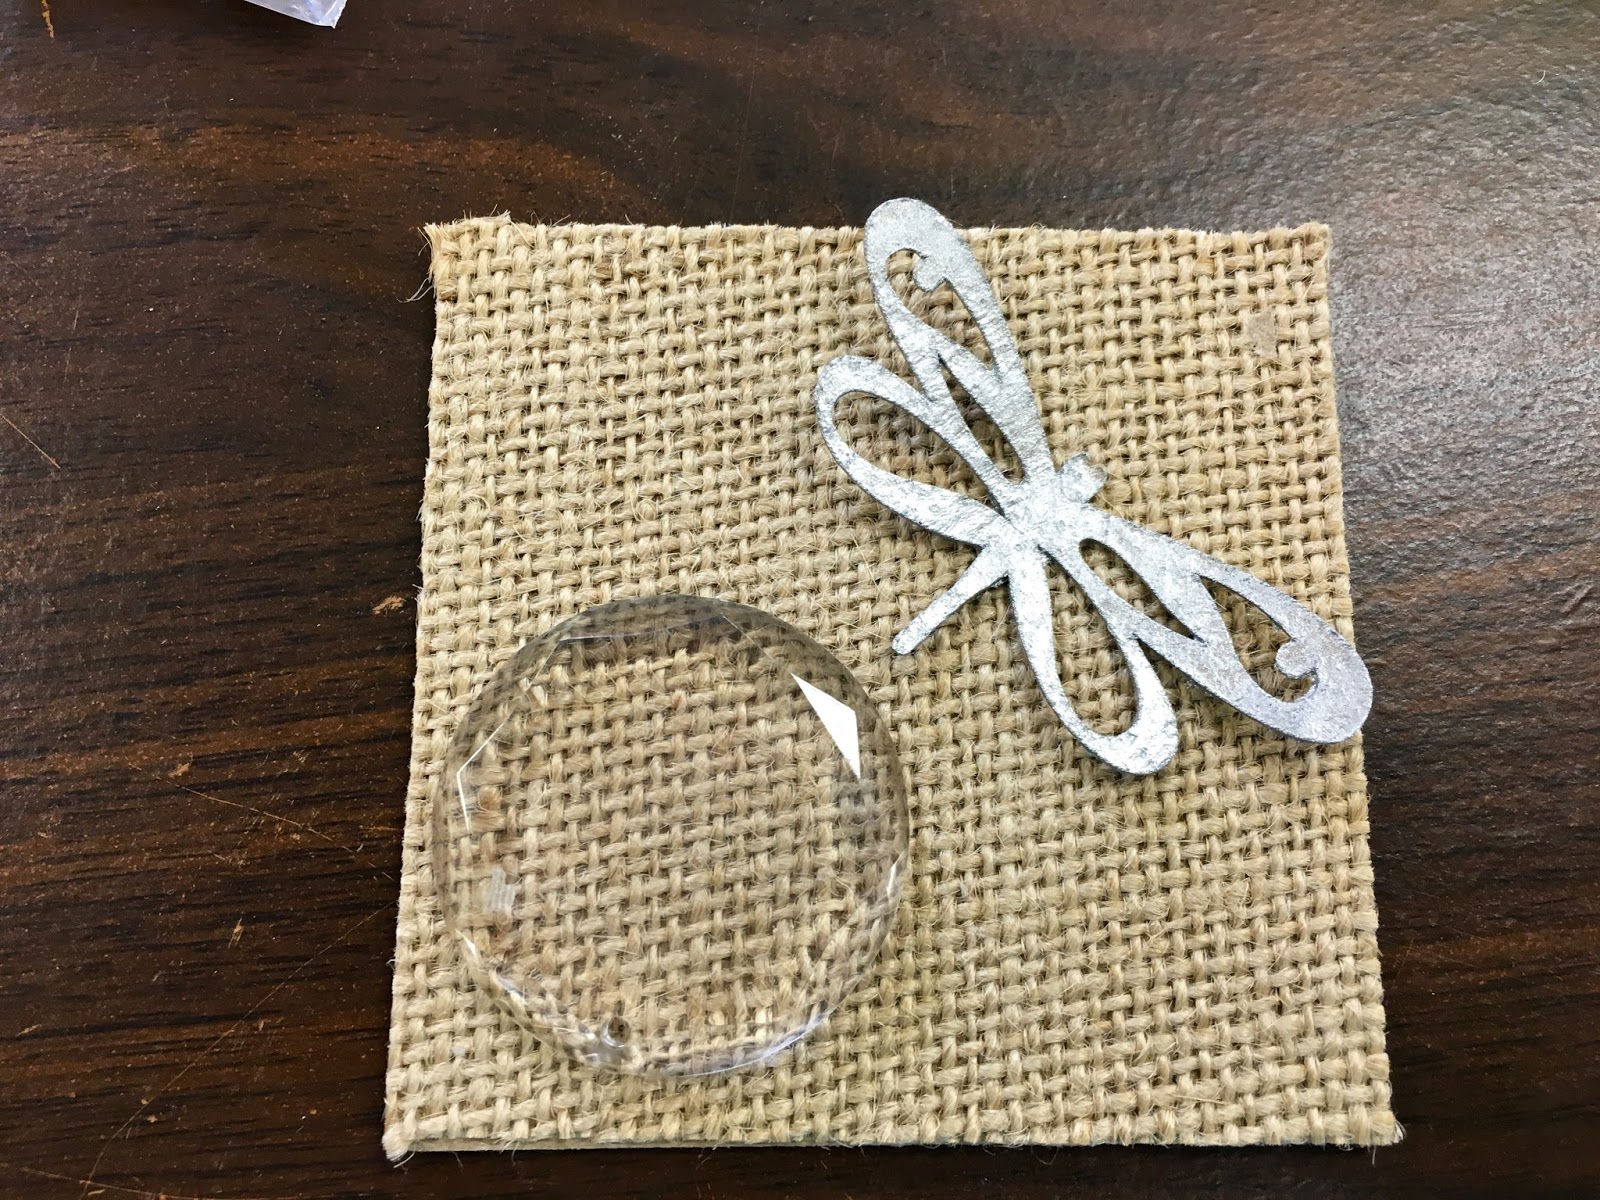
Ah.  The mini burlap frame.  When I made my original I found 3 x 3 burlap canvases.  And now I can't!  So, I made my own.  I cut 3 x 3 chipboard pieces and was originally going to wrap burlap around them.  However, I could only find the wider woven burlap and it did not look right on the chipboard.  So I had some burlap banners in my cabinet that were paper backed.  Perfect.  I simply cut them to the correct size and glued them to the front of the chipboard!


Chipboard letters.....I chose to use the word "fly".  You can use whatever works for you.  Since they are chipboard, I painted them.


The original had a cute metal butterfly from Maya Road.  I simply could not find them in time for the weekend.  So, I punched these using a Martha Stewart punch.  Distress ink the edges and add stickles.  Butterfly is only adhered on the body so that it looks as if it is flying.


Wooden swirls from Simple Stories.  They have some super cute ones.  I have also used chipboard ones from Dusty Attic.  Just a flowing swirl....painted of course.


The one image in the upper left is "hung" on small clips.  These clips can be purchased at Michaels or you may even be able to find the Canvas Corp ones I used.  You will need to bend the top of the hangar part so that it will lay flat on the canvas.  The screw head you see is actually a brad.

Once you have all of your elements, lay them out on the canvas before you adhere anything.  Many of the ladies at the retreat added other elements from their own stash.  I hope you enjoy making this.

Take a visit to Gecko Galz Etsy store.  There are so many cute collage sheets that you could do this with.  I think I may need to do a vintage Easter one!

Blessings

Monday, February 15, 2016

A little bit of love to go around

February.  I can't believe that January is already gone!  In 2 weeks I will celebrate 2 of my kids birthdays.  Wow.  Guess I better get back in the groove of things!

I want to share my February projects with you....Gecko Galz has some of the most adorable images this month.

First up is this vintage inspired tag.  A while back I found this wonderful dictionary paper so I decided to use "love" on a tag.  The images are from Valentine Wishes collage set, Noteworthy collage set, and the February paper pack.  After printing, I fussy cut and combined them to make the tag.

 Just love the stamps....
 Added some mini pearls and stickle to the frame....
 And of course a little distress ink....
 Some vintage lace to finish it off.....

Last month I began a small calendar that hangs in my craft room.  Each month I will add my favorite images.  Here is February's.....
 Closer inspection...
 I just "love" the love image.....
 And I say this to my kiddos....


Stop by Gecko Galz to see all the new images.  There is a free gift with purchase too!  Hope you have a great day crafting.  Stop by again soon...there just might be a freebie coming up!